Tidal Fish Forum banner

Going Back At it - Seacraft #2

51K views 76 replies 33 participants last post by  Chessie  
#1 ·
I like the 23 so much, i decided i needed a 20 as well. Here she is :
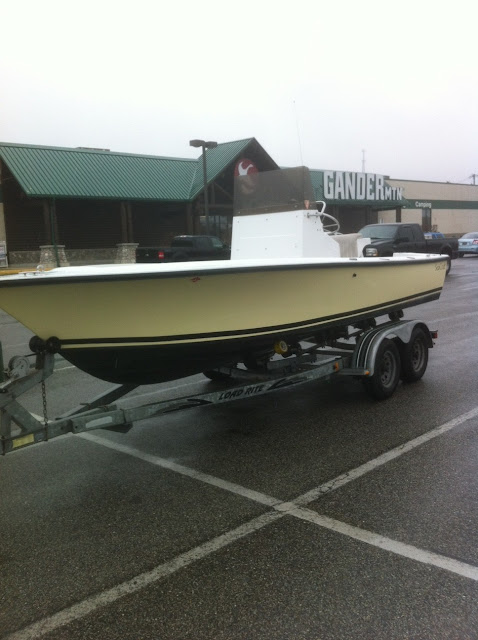
1988 20 Seacraft

Image


The hull is in suprisingly great shape. She's painted with awlgrip fighting lady yellow. The inside is also snow white awlgrip, but does need some love. The boats original console is way too big for a 20' boat. So, i'll either hack this one up, or seek out a new, smaller console. I plan to pull the fuel tank and give it a look. There's a soft spot in the deck in the starboard rear corner. I'm going to address that, without cutting up the whole deck.

I bought the boat without power as im not interested in an old motor. If i can find something used in really good shape i'll bite on it, otherwise something like a 130/150 etec, 135/150 Optimax, or a 140 Zuke 4 Stroke.

My plan is to leave it all open with no-top to maximize space for fly and light tackle fishing. More pics to come shortly when i start tearing her down.

-Mike
 
#3 ·
Do you plan on leaving it as a notch transom?

And, I hate you, too! I need to start cruising craigslist for a hull.
 
#4 ·
Do you plan on leaving it as a notch transom?
I do plan on leaving it notched with a wash gate so that water cannot enter the cockpit.....very similar design to my 23.
 
#8 ·
Where were you 6 years ago when I had a '70 Potter hull SC 20 in the front yard for a year and a half looking for a buyer? It was dying for your treatment, but everyone who looked at it wanted a warranty and a turn-key fishing machine. Some guy in FL finally bought it for a restoration.
Pat in Joppa
 
#19 ·
what do you do for a living and what drinks do you serve the wife
I work at a school, which gives me a ton of time off. I made it very clear to my significant other what to expect with me and boats and that it was non-negotiable.

How do I find pictures of your last sea craft job? I have a friend doing the same thing right now up in Cape Cod.
http://www.tidalfish.com/forums/showthread.php/243115-Seacraft-Progress

http://www.tidalfish.com/forums/showthread.php/279019-Project-23-Seacraft-Thread-%28new%29

Mike did you find that on the upper eastern shore?
I bought it on the lower eastern shore, Salisbury to be exact. I believe it was an Ocean City, MD boat.
 
#18 ·
What do you mean by keeping it a notched transom with a wash gate?
It means that the transom is low, however there is a bulkhead in front with a folding door that completely closes off the transom so that no water can make its way to the cockpit. In this pic you can see the bulkhead, and there is a door that folds up that goes the full height of the boat, so if a wave washes over the stern it does not enter the boat.

Image
 
#20 ·
Hi Mike-

After seeing the great job you and your Dad did on the 23', I am anxious to see the progress on the 20'. Please take and post lots of pics along the way. Doubt I will ever restore a boat, but it is very interesting to see the steps involved.

I have fished on 23 Seacrafts with a bulkhead in front of the notched transom and to say no water comes in may not work out quite that way in practice. We took waves over the entire thing and the water comes crashing in. :)) It is a good idea, however, and does keep water out most of the time.

BTW, trip to ocean and CBBT was pretty lack luster this week. It was a super winter down there, but I guess I am done for this year.
 
#22 ·
Misery Loves Company

Hello All -

This presidents day weekend was the official start of my 20 seacraft restore. I got in a couple of good days of work. Being back in the shop with a grinder in my hand brings back some memories that im not terribly fond of. My whole point in buying this boat is that it would be a quick flip, ready to go in no time and shopping for an engine sooner rather than later. The pics will tell a different story.

To start - here she is day 1. Notice that the hullside paint is in very useable condition. I'm not terribly thrilled about the bottom paint, but i'm not going to be painting this boat. At least not the outside.

Image


And the inside - again youll notice the paint on the inside is also very useable as is. The question is, how much will i destroy it will working on it? If i can skate through without too much mess, i won't be painting the inside either.

Image


Image


And the mayhem begins............

Leaning Post Out -

Image


Console Out - i basically just cut all the wiring, because i'm not re-using any of it. So, it was as simple as removing a few screws and breaking the seal from the console to the deck.

Image


Fuel tank hatch opened up. Revealed the original tank, made in november 1988.....70 gallon capacity. .125 thickness and was coated with some kind of epoxy paint. Orginal fuel lines and clamps as well.

Image


Fuel tank out of the boat (you can see it in the background on saw horses -

Image


The fuel tank was sitting on a piece of 3/4" UNGLASSED plywood. It was wet and heavy so i went ahead and cut it out and started cleaning out the bilge.

Image


Now here is where things take a turn for the worse...............Before buying the boat, i knew i had a squishy place in the deck in the starboard side rear corner of the boat. My plan was to just cut that section, repair it, and leave the rest of the deck alone.

Opened it up - only to find wet wood, which is what i expected

Image


I kept working forward, continuing to find wet wood. I cut 1/4" in, removed the top skin of glass, dig out the wood with a chisel, leaving the bottom skin in tact.

Image


Unfortunately - curiousity killed the cat and i had to open the other side.......only to find wet wood again.

Image


I spent the next several hours with a hammer and chisel. I removed all the old wet wood from both sides, leaving the bottom skin in tact.

Image


At this point, i have already spec'd out a new tank and will order this week. I am going to cut the capacity back to 50 gallons leaving me with a tank about 26 inches shorter. I will move it all the way forward to help counter balance the weight of a new, 400+ pound engine.

The deck is going to hopefully be an easy repair. You can see, there isn't much deck with the hatches removed. I will hit the bottom skin with some 80 grit, lay down a piece of thin cloth (2oz or 4oz), and lay new wood on top of that weighing it down to get good ahesion. I will re-use the top skin of the deck basically just hitting the underside with 80 grit, then gluing it down to the new, fresh wood that i put in. I will hopefully make quick order of the deck repair and get back on track. I'm going to make my best attempt to protect the inside of the boat to hopefully save a decent awlgrip paint job. I'll re-apply non-skid and you won't know the deck was ever cut...........hopefully leaving me with a much more solid deck.

The console was a monster on this boat, and original.......by monster i mean probably 150 pounds and would not look out of place on my much larger 23 seacraft. It's way too big for the boat and has to go.......

If anyone has a need for it, feel free to PM me and we can make a deal :

Image


I've got a week off the last part of march..........expect some serious progress during that week!!!!

Tight Lines

-Mike
 
#26 ·
Is there wood in the transom?
The transom is wood. However, it seems very solid. Not sure i will touch it. It's also, un-usually beefy. I suspect it had to be since it's rated for a 225. I'd say respectively the transom is 2.25" - 2.5" thick. Like i said, beefy for a 20 foot boat.
 
#24 ·
Your right, the boat did come from Ocean City, it was my uncle's old boat (if not it sure loooooks like it). He just painted it 2 years ago, and he babbied that boat!!! He had it for a long time before he got his new boat, that boat had a 200 merc on it with a jack plate and it would scream!!! I am going to tell him about this and hopefully he can chime in

Jay
 
#25 ·
Your right, the boat did come from Ocean City, it was my uncle's old boat (if not it sure loooooks like it). He just painted it 2 years ago, and he babbied that boat!!! He had it for a long time before he got his new boat, that boat had a 200 merc on it with a jack plate and it would scream!!! I am going to tell him about this and hopefully he can chime in

Jay
You are absolutely right. The boat had a 200 merc 2 stroke with a jack plate. I'd love to hear from your uncle!!!!! I met the previous owner of my 23 as well. Great boats!!!
 
#28 ·
Congrats mike. A buddy boat for me on here. The notch on the '88 was much higher than the Potter-ear boats. My boat originally had a wash gate that was on a piano hinge. You can see it in the attached:
Image


It essentially fit in a notch in the engine well as such:
Image

All that said, I have not reinstalled it and have yet to feel uncomfortable as a result. GL with the project.

P.S. - I still dont have the tank out of mine. What a PITA!
 
#29 ·
Yesterday was a fine day for glasswork. I drove down to the shop and got the heat pumping in there. I decided to go with polyester resin on this restore. Polyester is a little more finicky than epoxy. It only has a 3-4 month shelf life. Mixing a quart of resin only requires a few drops of hardener to start the reaction process. The epoxy we used on the 23 was a 1 to 1 mixture so this was a bit of a change. Likewise - when the temperature is over 55 degrees, you have very little working time with polyester resin. By that i mean just a couple of minutes before it starts to tack up. Also - if you are only doing 1 layer, you need to add in a parafin wax or the surface will remain tacky. If you don't add in wax, then you can add additional layers without sanding. In any case, the polyester stuff was all a little new too me.

I bought my material from here. Heck of a nice guy to deal with and you can pickup your order if you're local.

http://www.fiberglasssite.com

Here's a tip if you ever do a floor the way i'm doing this one. Go to harbor freight and spend $15 and pick up one of these :

Image


I chiseled out the wood in the boat by hand the old fashioned way, with a hammer and chisel. I had enough of hitting myself in the hand with the hammer so after some research i came up with the air chisel. I still had to remove the wood from the top skins i cut up out of the boat and it worked like a dream. Quick and easy :

Image


I decided to use a regular exterior grade plywood on this deck. The original plywood was only 1/2", 4 layers, and had plenty of voids in it, so i do not think it was a marine plywood. It lasted a long time and was not taken care of, so i think this should work perfectly fine. Polyester resin doesn't like cold temps so i first started by heating up the inside of the boat.

Image


I cut some cloth and layed it up on any holes through the bottom skin. The screws used to hold down the console were pretty long and went through the bottom skin. I patched the holes before laying down the plywood.

Image


I taped everything off because im trying to avoid hours and hours of sanding spilled resin :

Image


I mixed up some resin and thickened it with cabosil to a peanut butter consistency. Spread it on my bottom skin then laid in my new plywood. I cut solid pieces of wood instead of the 5x5 squares that came out. I hope this will tighten up the floor and make it stronger. Weighed it all down and let it set up :

Image


Other side done as well (buckets filled with water)

Image


With the extra thickened resin, i went around the edges and seams and made a nice fillet to seal it all up

Image


I left everything to set up and took my old fuel tank to the fabricator to have a new one built. I'm looking at about 3 weeks to get the new tank. In the meantime i hope to get some bulkheads in and slats for the tank to sit on. I need to order new fuel lines and hopefully by the first of april i can re-install the tank. My next trip home i will glue the topskins back down to my new plywood, grind out the seam and then seal it up with some 2 - 3" wide cloth and resin.

One thing to note - all of this was so much easier the second time around. It almost feels natural and not even a big deal. I remember the first boat everything was so much slower because we stopped at every increment to think things through. If i didn't have to drive 100 miles to work on this boat, i would have it done and ready for power within 2 months.

Oh well - til next time................

-Mike
 
#30 ·
Looks good Mike. I think you'll grow to like working w/ poly. I've been using vinylester on the Mako and found it wets out better than epoxy. A little trickier to catalyze, but it's worth it for the cost savings IMO.
 
#33 ·
I got in another good day of glasswork on the 20 yesterday.

I pulled off the weight to reveal the new, dry plywood. It seems like i got a pretty good bond and i could walk up and down each side without any flexing.

Image


My previous trip home, i had already cleaned up the top skins, so i went ahead and glued them down. We had it roasting in the shop so i did one side at a time because we were short on cinder blocks.

Image


While that side was setting up, my next order of business was the fuel tank hatch. This thing weighed a ton.

Image


I set the depth of a skill saw to 1/2" and ran down the hatch in cross hatched lines, and then we started chiseling it all out.

Image


It was extremely wet (not rotten) stinky, heavy plywood in there.

Image


Once the hatch was all cleaned up, i set it by the wood stove to dry out for an hour or so. I hit the underside with the grinder, then some 40 grit sand paper to scuff it up. I cut out some new plywood and glued it down

Image


AFter a couple of hours i pulled off my weight to check out my new deck. Seems like i got good adhesion and the deck seems nice and tight.

Image


I filled the seams with thickened resin

Image


I got both sides glued back down, let them sit for a couple of hours and pulled the weight to check it out. Here's my new deck

Image


Image


At this point i have used 3 gallons of polyester resin. The deck project came out pretty well. My next trip i need to grind the seam and i will seal it up with a 3-4" tape and glass it down. After some sanding, fairing, and fresh non-skid i don't think you will ever be able to tell it was done. I hope to also get my tank hatch underside glassed. As much as i don't want to do it, i think i am just going to have to bite the bullet, sand, prep, and shoot the inside of the hull with a fresh paint job. It's just going to be much easier with it taken apart. The boat is so much smaller than the 23 it shouldn't be a terrible job.

I have to imagine that i've gotten rid of 100 pounds of wet plywood on this boat, possibly more. The tank hatch weighed probably 100 pounds before and i could pick it up with 1 hand after. Same story with the deck.

I've got a week off at the end of the month and i hope to make some big strides on the project. Be nice to have the boat in the water by summer.

-Mike
 
#40 ·
As much as i don't want to do it, i think i am just going to have to bite the bullet, sand, prep, and shoot the inside of the hull with a fresh paint job. It's just going to be much easier with it taken apart. The boat is so much smaller than the 23 it shouldn't be a terrible job.
Mike - rather than shooting the whole inside, why not just shoot the floor from gutter to gutter (will hide your paint line)? You will still have to blend a little forward and aft, but will safe you a ton of time and if the majority of the inside gunwale, foredeck and topsides are more than serviceable, will have you on the water in no time. Just a thought. Floor gets so dirty, no one will ever tell that you did just the floor.

Matt